Build High-Quality Printable Birthday Invitations Step by Step in 2026 Using Invitations Customization Tools
Introduction
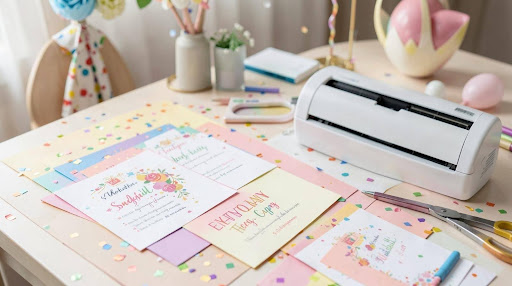
Printable birthday invitations continue to play a practical role in event planning. They establish tone, confirm logistics, and give guests something tangible to reference before the celebration. Whether the event is for a child, a milestone birthday, or a themed gathering, the invitation functions as both information sheet and visual cue.
Many hosts creating invitations are not designers. They are working within time constraints and need tools that reduce layout guesswork, manage print settings automatically, and provide ready-to-edit templates. Invitations customization tools are built for this purpose, combining preset sizes, editable text blocks, and export controls in one environment.
One accessible starting point is the Adobe Express printable party invites tool, which offers browser-based editing and print-friendly templates sized for standard envelopes. Used correctly, tools like this allow users to focus on clarity and organization rather than design theory.
The guide below outlines a step-by-step workflow for creating printable birthday party invitations efficiently, with practical checks at each stage to avoid common print errors.
Step-by-Step How-To Guide for Using Invitations Customization Tools
Step 1: Choose a Print-Sized Template First
Goal
Start with a layout that already matches standard print dimensions and envelope sizes.
How to do it
- Open your invitations customization tool and filter for birthday templates.
- Select a size such as 5×7 inches or A6.
- Choose a layout with clearly separated sections (headline, event details, RSVP).
- Duplicate the template before editing.
- Confirm document size in the editor settings before proceeding.
What to watch for
- Avoid templates labeled for “social” or “story” formats.
- Ensure margins are not too tight.
- Confirm the orientation (portrait vs. landscape).
Tool notes
If you want to check how the design looks on different paper stocks, a print-on-demand service like Vistaprint can be used later to preview finishes without redesigning the layout.
Step 2: Insert Core Event Details Before Styling
Goal
Establish accurate, complete information before adjusting colors or fonts.
How to do it
- Replace headline text with the birthday name and occasion.
- Add full date, time (including AM/PM), and venue.
- Include RSVP contact and deadline.
- Add short instructions (dress code, theme, parking notes).
- Read the full invitation aloud to catch missing details.
What to watch for
- Missing time zones for virtual events.
- Incorrect venue spelling.
- Overlong instructions crowding the layout.
Tool notes
If you plan to coordinate RSVPs digitally, a CRM platform such as HubSpot can help track confirmations alongside printed invitations.
Step 3: Adjust Color Scheme With Print in Mind
Goal
Align colors with the party theme while maintaining legibility when printed.
How to do it
- Select 2–3 complementary colors tied to the theme.
- Change background and accent blocks consistently.
- Increase contrast between text and background.
- Preview at 100% zoom.
- If possible, print a single draft page to check saturation.
What to watch for
- Light pastel text on white backgrounds.
- Dark backgrounds that may consume excessive ink.
- Neon colors that shift unpredictably in print.
Tool notes
For quick palette inspiration before returning to your design, tools like Coolors can help generate balanced color combinations without modifying the layout itself.
Step 4: Simplify Typography for Clarity
Goal
Ensure all text remains readable at actual printed size.
How to do it
- Limit to two fonts (headline + body).
- Increase font size for date and location.
- Use bold instead of decorative fonts for emphasis.
- Keep alignment consistent.
- Avoid mixing more than two font weights.
What to watch for
- Script fonts below 14pt.
- Overlapping text boxes after resizing.
- Tight line spacing.
Tool notes
If you want guidance on accessible font sizing standards, platforms like Google Fonts provide reference previews showing readability at small sizes.
Step 5: Add a Photo or Graphic (Optional)
Goal
Enhance personalization without reducing print quality.
How to do it
- Upload a high-resolution image (300 DPI recommended).
- Crop within the frame provided by the template.
- Keep important visual elements away from trim edges.
- Adjust brightness slightly if the image prints too dark.
- Recheck text contrast after adding the image.
What to watch for
- Pixelation at print size.
- Text placed directly over busy patterns.
- Uneven cropping near the edges.
Tool notes
If you need basic image compression before uploading, tools like TinyPNG can reduce file size while maintaining print clarity.
Step 6: Prepare the File for Print
Goal
Export a clean, print-ready PDF that avoids trimming errors.
How to do it
- Confirm final document size matches intended print dimensions.
- Enable bleed if printing professionally.
- Keep all text inside safe margins.
- Select “PDF for Print” or equivalent high-resolution option.
- Save a separate proof copy before full export.
What to watch for
- Missing bleed settings (typically 0.125 inches).
- Low-quality export presets.
- Incorrect paper orientation during printing.
Tool notes
For professional finishing options (matte, gloss, thick stock), services like Moo allow you to upload the exported PDF without altering your design tool.
Step 7: Coordinate Guest Responses and Distribution
Goal
Track attendance and manage follow-up communication efficiently.
How to do it
- Print finalized invitations after confirming the guest list.
- Keep a digital copy of the invitation.
- Log RSVPs in a spreadsheet or CRM.
- Send reminder emails if needed.
- Confirm headcount before ordering catering.
What to watch for
- Conflicting RSVP deadlines between print and digital versions.
- Incorrect contact details.
- Overprinting without confirmed attendance.
Tool notes
For digital reminders or RSVP tracking, email marketing platforms like Mailchimp can complement printed invitations without affecting layout creation.
Common Workflow Variations
Minimalist Black-and-White Version
If printing at home, duplicate the design and convert colors to grayscale to reduce ink usage.
Photo-Forward Layout
Select a template with a large image placeholder and reduce decorative elements for clarity.
Pattern-Heavy Theme
Keep decorative backgrounds subtle so that text remains readable at print size.
Hybrid Print + Digital
Resize a duplicate design for email sharing while keeping the printable version at 5×7 inches.
Checklists
Before You Start Checklist
- ☐ Final event date and venue confirmed
- ☐ Guest list prepared
- ☐ Theme or palette selected
- ☐ High-resolution images available
- ☐ Envelope size verified
- ☐ Printer type chosen
- ☐ RSVP method defined
- ☐ Proofreading completed
Pre-Export / Pre-Order Checklist
- ☐ All spelling and dates verified
- ☐ Text readable at actual size
- ☐ Safe margins maintained
- ☐ Bleed enabled (if required)
- ☐ High-resolution PDF exported
- ☐ Test print reviewed
- ☐ Paper stock selected
Common Issues and Fixes
Blurry Photos
Replace low-resolution files and confirm export quality is set to high resolution.
Trimmed Edges
Reposition text within safe margins and enable bleed settings before re-exporting.
Color Shift After Printing
Test print and slightly reduce saturation if tones appear too dark.
Crowded Layout
Remove non-essential decorative elements or reduce body text slightly.
Unreadable Script Fonts
Switch to a clean sans-serif body font while keeping decorative headlines minimal.
How To Use Invitations Customization Tools: FAQs
Do I need design experience to create printable invitations?
No. Invitations customization tools provide structured templates that manage spacing and sizing automatically.
What size is best for printable birthday invitations?
5×7 inches is widely compatible with standard envelopes and offers comfortable readability.
Should I print at home or professionally?
Home printing works for small batches. Professional printing provides more consistent trimming and color accuracy for larger quantities.
Can I reuse the design for digital sharing?
Yes. Duplicate the design and resize it for email or messaging platforms while keeping the print version unchanged.
Why is template structure important?
Templates enforce hierarchy (headline → details → RSVP), which improves clarity for both guests and print accuracy.
Stay in touch to get more updates & news on Zero devicenet!